Showing posts with label Room Tour. Show all posts

Where Bloggers Create 2013

Pin It!

Where Bloggers Create
 
Hi, I'm Christie. Welcome to my blog and my studio.   I'm thrilled to take a part in this fantastic collection of artists from around the world.  I want to take a moment to thank Karen from My Desert Cottage for putting together this event.  I would love to hear any input you may have.  I know you have lots of creative spaces to visit so please do not be shy to follow, pin or subscribe (whatever suits your fancy) so you can come on back at your leisure.  I have plenty of organization tips, tricks and videos to make those projects easier to manage.  I began my love for all things created by hand when I was a child and have never ceased. Enjoy!


My room began as a bedroom 17 years ago and evolved into the room you see today. My studio was originally published in 2010 which  you can see HERE and video tour HERE. As does everything, my studio also has evolved over time.  It recently was featured in the Summer 2013 issue of Paper Cloth Scissors Studio magazine.  My needs are ever changing and so I have adapted some changes to my studio.  One example of this change was is that I decided to remove my thread racks from the north wall.  Although they were a beautiful splash of color, I felt that the air, humidity and my other art supplies were not doing them any good and decided that they would be better stored in a closet.  I am now better utilizing that space by creating one area for all of my "messy" artwork. i.e. paints, inks, etc. Everything is within reach and able to be quickly cleaned up.  

My studio is not big, only 13' X 15'.   I made the most of every inch with the custom made cabinets purchased at Home Depot, they are KraftMaid brand topped with the beautiful granite counter tops.  Can you find my mini fridge? It blends in seamlessly with the cabinets and is stocked with water bottles to keep me hydrated while I work.  I also love my big Wacom monitor and my LCD TV that when I am facing away from it reflects in the mirror across the room so I can still watch what's going on. Clever, huh? Since most of the walls were going to be covered with cabinets and windows I decided to add texture and interest by adding wallpaper to the ceiling (you can see this in the video). It is a textured wallpaper and we painted it white, it looks like a pressed tin ceiling. My handy father & husband helped install the cabinets and the crown molding and I made the curtains. Voila! 


I try hard to keep my work spaces clear but that is not always possible with never ending projects.  I have adopted a project bin system to keep myself organized while multitasking.  You can find the post explaining more HERE.  Addie has become quite the helper but has decided that my project bins also make quite the nice bed at times. 
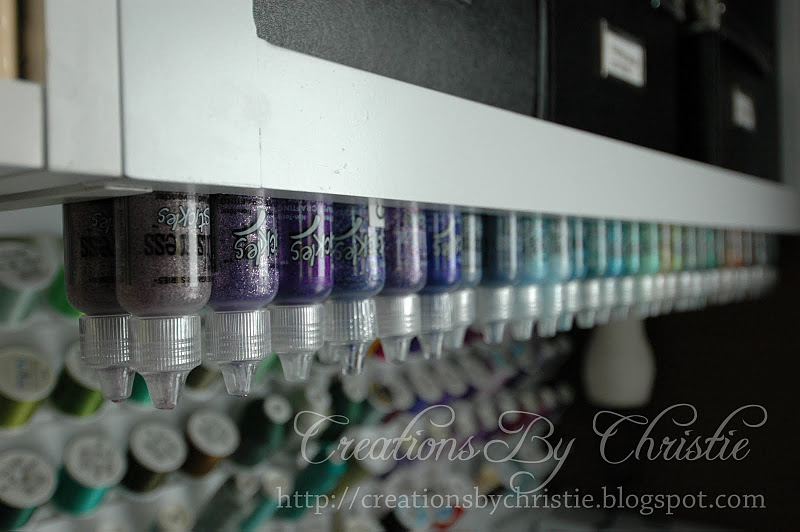
I store my stickles upside down by gluing a magnet to the bottom of the bottle and adhering a metal strip to the underside of my cabinet. Love my Stickles :)
 
My favorite place to create in my studio is my "Distress Station".  From one seat I am able to access all of my Paints, Stains, Sprays, Embossing mediums, Inks, etc.  I have a post that goes into it a bit more that you can find HERE

 
To the right of the door I have a few shelves that I added after we designed the room I store all my paints on the shelves and I have drawers that I got at Container Store that I keep all my chipboard alphabet letter in. It makes it very easy to find just what I am looking for. The cabinet just to the left of this is a pull down ironing board (you can see this in a earlier blog post on altered clipboards). Underneath I keep a roll of paper towels for quick clean ups along with baby wipes.
 
 
With everything well organized I am able to find everything quickly and easily.  You may be interested in some of these posts archives where I have entire blog post full of step by step tutorials, photos and videos to help you out.  This is just a few to start you out... you can find more in the search bar on the right side of my blog or under the subject manner in the categories column.


 Here's a basic layout of my studio with some of the dimensions.  I have 4 stations that I am able to sit even though I do not have 4 chairs in the room at one time.  I use 2 simple desk chairs, one on either side of the room that serve 2 stations.  I keep the sewing machines and serger under the desk area when not in use and just pull them out when needed. 
I hope you enjoyed your stay and hope to see you again soon!
 

Featured in Studios Magazine

Pin It!
I am proud to announce that my studio has been featured in the Summer issue of Studios Magazine.    I was honored to be asked by the editor to share my creative space in her publication.  

Studios Magazine brings together artists of all mediums; painters, quilters, printmakers, potters, jewelry makers, etc. to share their creative spaces and how it works for them.  If you are looking to design a creative space this is where you want to look.  Since I originally introduced my studio on my blog and YouTube way back in April 2010 it became a source of inspiration for other artists.  I have received many questions over the years about how I designed it, where I purchased items for my studio, etc.  I did my best to answer all these various questions plus include some of my organization tips and tricks. You can find it at any book stores like Barnes and Noble or at craft stores such as Hobby Lobby, Michaels or JoAnns Fabrics.  The magazine will be on newsstands till mid August and is also available in a digital version at Paper Cloth Scissors. Enjoy!

Color Labeling the RANGER STATION

Pin It!

I made further improvements upon the Ranger Station.  I color labeled the tops of all my lids so that I could easily find just the right color for the project.  It was quite easy and terrifically fun to do.  I ran a scrap piece of  white card stock through my Xyron sticker maker so that it was ready for my lids.  I then cut out a bunch of 5/8" circles using my Marvy round punch. 

I decided to start with the Distress Stains first.  I placed all the stickers on the lids and colored them in place.  You can, of course, color them first and them adhere them.  I just find it easier this way.  And here is a great TIP... to get the backing off of the sticker, stab the back in the center with a pin and remove.  Not only is it way easier to remove the backing but you essentially are shish-kabobing all the left over backings making clean up a breeze!

My next step was to simply start staining all the tops of the stain lids. So quick and easy.  And a great reference to have at a glance!

I also added a drop on the tops of my Dimensional Pearls.


 Next came the messier, which for me is the part I really enjoy! I used one of my favorite and probably one of the cheapest tools you can have in your craft studio...Q-Tips!  You can get a huge bag at the $1 store or on sale.  I use them all the time to mix try out a color.  Add a little of this or that.  You get the picture! 

 I use the Q-Tips to add just the right amount to my stickers that I had already put on to my Adirondack Paint Dabbers (1st picture in the post) and the Claudine Hellmuth Studio Paints.  I  am in love with my new Ranger Station!  Now it's time to CREATE!!!

Distress Station!

Pin It!

I'm updating it already.,.  the Distress Station name has been changed to the "Ranger Station"  since it's not all Distress products and it is mostly Ranger.  I thought it was more appropriate as the Ranger station.  And as a camper, I like the play on words too.

The Distress Station has been born!  I'm always rearranging my studio to best suit my needs.  I have several stations in my room, such as my die cutting area, an area which I keep all my tiny adornments and all that I need to attach them, computer area, etc. Probably the area that I love the most is my messiest and most used.  My "distress" area for lack of a better name.  It has all my Distress inks, stains, crackles, etc.  I did some rearranging so that on the counter in front of me is my Studio paints, Daubers, Shimmer Sprays, Crackle Paints, and Distress Stains.  To the right of me is all of my Distress Inks and applicators.  In the drawer under the counter is my well loved collection of Alcohol Inks.  And with a swivel of my chair I have full access to all of my Embossing Powders.  I  think this is going to work for me!  My crafty heaven my not be as pristine as before but now I can have access to all by favorite things at my fingertips. 


What I used for my display trays are Cabinet Organizers from the Container Store.  They are a 1/4 round and have 3 tiers.  I just placed 2 together to make a half circle against the wall.  Now I have a eye appealing display that is also extremely functional!

Ranger Ink featured my post :)

Pin It!


OMG... I just found out that my Stickles organization has been featured on the Ranger Ink Blog!!! What an honor!  You can see my original post HERE and the Ranger blog post HERE. 


Where I Create...

Pin It!


Hi for those that are new to my site I'm Christie and this is my craft studio! This is one of my favorite places to be. You can say that I am a collector of hobbies. There isn't one yet that I've tried that I haven't enjoyed on some level. Some more than others, but I love to combine what I have learned over the years in my art. So when I designed my room I needed to plan my space carefully as I had lots of stuff I needed to store but still have access to. I also needed to have a place where it was functional and inspiring to me. I definitely achieved my goal. I hope you like it...

Welcome to my craft studio. The dimensions of the room are 13' X 15'. My husband and I remodeled this room a few years ago. I love my new granite counter tops and custom made cabinets purchased at Home Depot, they are KraftMaid brand. I even have a mini fridge stocked with water bottles to keep me hydrated while I work, you can see it in the right hand corner under the window. I also love my big Wacom monitor and my LCD TV that when I am facing away from it reflects in the mirror across the room so I can still watch what's going on. Clever, huh? Since most of the walls were going to be covered with cabinets and windows I decided to add texture and interest by adding wallpaper to the ceiling. It is a textured wallpaper and we painted it white, it looks like a pressed tin ceiling. My handy father helped install the cabinets and the crown moulding and I made the curtains. Voila!


I have a great spot for my Cricut and printer on the wall to the right of my computer. I used velcro to attach all my cartridges to the wall behind my machine (they are in alphabetical order) The booklet and overlays are kept in the bottom narrow drawer right next to my computer. Everything is very handy.

To the right of the door I have a few shelves that I added after we designed the room I store all my paints on the shelves and I have drawers that I got at Container Store that I keep all my chipboard alphabet letter in. It makes it very easy to find just what I am looking for. The cabinet just to the left of this is a pull down ironing board (you can see this in a earlier blog post on altered clipboards). Underneath I keep a roll of papertowels for quick clean ups along with babywipes.
I have several cabinet that have pull out shelves this one has alot of my embellishments. I show 2 of the drawers below where I store brads, beads, gems, etc.
And...Of course a GLITTER drawer!
Another drawer...With my alcohal Inks.

This wall I have my Embroidery machine and Serger on the desks, when I am not using them I can store them under it. I keep my wood rubber stamp in view on the rounded shelves next to the mirror but I keep the clear mount ones in 3 ring binders.

I have all my Distress Inks on one side and all my other ink pads on another side. The drawer with the alcohal inks is right below the distress inks, so when I'm doing techinques with those items they are handy.

I store my stickles upside down by gluing a magnet to the bottom of the bottle and adhering a metal strip to the underside of my cabinet. Love my Stickles :)


You can also see a video tour of my Studio. Don't forget to see Part one and two.

PART ONE


PART TWO


Still didn't get enough...

You can see some of my favorite organization ideas HERE

Thanks for stopping by! I hope you enjoyed your visit and you will come back again soon. Feel free to become a subscriber or follower to stay posted to the new and greatest news, projects and ideas. Have a great day!!!

Follow Me on Pinterest

Search This Blog

Grab My Button


Contact Me At

Archives

MyFreeCopyright.com Registered & Protected