I made this card for my Dad who I definitely think is Super! He is my hero, he has been battling Non-Hodgkin's Lymphoma for 10 years now. Nothing ever stops my Dad, he is like the energizer bunny. I gave him this card he was going through a pretty rough treatment for his Cancer. He is my Super Dad!!! I used the Cricut Indie Art cartridge and the Make the Cut with a font on my computer to create this card.
The Cuttlebug is a universal die cutting machine, so it will accept leading brands of dies. So you do not have trouble figuring out what plates/pads to use with your Cuttlebug when using other dies I posted a chart that tells you which plates to use with what dies.
You can get the full Cuttlebug competitor sandwich stack chart HERE
I made this card using the Leafy Branch embossing folder and the Cuttlebug. I used the metal sheet from Quikutz and then alcohol inked the top with Tim Holtz Adirondack Alcohol Inks. When the ink was dry I sanded the top to reveil the design. I finished it with a few flower punches and topped them with bling. Quick and easy card for any occasion.
I found an easy way to store my Alcohol Inks. I have a slight love of my Tim Holtz Adirondack inks as you may see. I needed to have them all. You may not have as many as I do but you can use the same storage idea to store your ink pad re-inkers. I have found it to be super handy. Hope you enjoy the video. :)
I created the most convient way to find your take out menus. It is soooo much easier than sifting through a junk drawer looking for that pizza menu or the restaurant you went to and loved but forgot the name of. I used my Cricut to organize all of my Menus.
I sorted all of the menus and put them in each folder. I cut out labels for each folder to say what type of menus are stored in each folder. I cut it out in black vinyl. I also keep a pad of paper and pen in the front pocket of the 3 ring binder to take down our orders. I keep our orders from our favorite restaurants so I remember what we like to order and what the total is.
I got the 3 ring binder and the velcro closure binder pocket inserts from an office supply store. You can also use the zipper closure binder pocket inserts.
Great gift idea!!! I made two of these for my sons and when my oldest moved last year I drove around his new neighborhood gathering menus to add to his menu folder.
I have so many flowers in so many colors and sizes how do you keep them all organized? I found a simple way to find just what you need quickly. I use the stacking round containers that you can get from JoAnn Fabrics or Michaels. They come 4 or 5 in package with a lid but I stack them much higher than that. I sort my flowers by color and size. I just bought a big tube of Prima flowers and instead of having to sift through them every time I needed one I sorted once and now I can find them all very easily. I store my larger flowers in two glass cookie jars that I got at Walmart. Most of the flowers in those were dismantled flowers from the Dollar store or Walmart.
In this tutorial I show you how I make my own glimmer mists. I store them in this recipe box I got from Michaels. It was unfinished when I bought it and I painted it black and then used Mod Podge to attach a scrap piece of scrapbook paper to it, wrapping all the way around, lid and all. I then used an razor blade to cut through so the lid can be opened. The box holds 47 Mini Misters!
This is what I use to scoop my Perfect Pearls into the Mini Misters. You can find the Darice Bead Scoop in the jewelry department at JoAnn's it costs about $2.
This past week I have been busy helping a friend, who is a teacher, level her books for her classroom. I learned that leveling books is a useful tool for the children as is helps when learning to read when to move from one book "level" to another. I used my Cricut to label all of her books with the alphabetical letter to correspond with the level of the book. Scholastic has a website that helped me find what level the books were at by entering in the name of the book or the author. The books are now easy for the children to visually find what level they can read at and are easy to put back on the shelf when done.
To do this I made the letters using mostly All Mixed Up with the exception of a few that I thought might be hard for the kids to read, those I used Opposites Attract. I made the letters at 1 7/8" and backed them with the Shadow Blackout circle on the All Mixed up cartridge cut at 2" I used the paper saver mode and was able to cut 49 of them on a 12 X 12 sheet of black card stock. I then ran them through my Xyron sticker maker and attached them to the appropriate books. They are now easy to sort and easy to find. Great tip for teachers and parents too!
This morning I made a video on how I organize my Cricut stuff. I have found this system to be very useful in having everything handy and right at my fingertips. I am never searching for anything and know exactly what I have. One thing I didn't mention was where I keep my mats I store them on hooks on the back of the door. Sorted by size, of course. The cartridges on the wall are attached with clear circles I got from Walmart. You can stop by the Cricut website and print the sample sheets just click HERE Enjoy!
Get the Cricut divider Right tab HERE Get the Cricut divider Left tab HERE Get the Cricut divider Center tab HERE
I have had lots of requests asking how I store my embossing folders so here you go... In a previous post I showed you how you can have a handy tags with all of your embossing folders to use as a reference now I will show you how I actually store my embossing folders. I have a box that I bought at Ikea. I created a design to make a folder for each embossing folder to be able to see the design clearly and to see the name of the design. I created this system quite a while ago (before the Coredinations) so the folders are done in white cardstock and inked over the top of the design to reveal the pattern.
I plan to do them again in the Coredination paper to match my tags. Too Cute, right!
I had a brainstorm at the craft store yesterday and had to share it with all of you! I think I came up with a new technique, I've never seen it before and I pushed it to the limit, I think. After I made the video I decided I would have changed one thing, I would next time use a glue pad instead of my embossing pad when brayering on the folders. Watch the video and see what I came up with!
I would love to see what you create using the techniques I teach you. Drop me a email at creationsbychristie@gmail.com Happy Crafting!
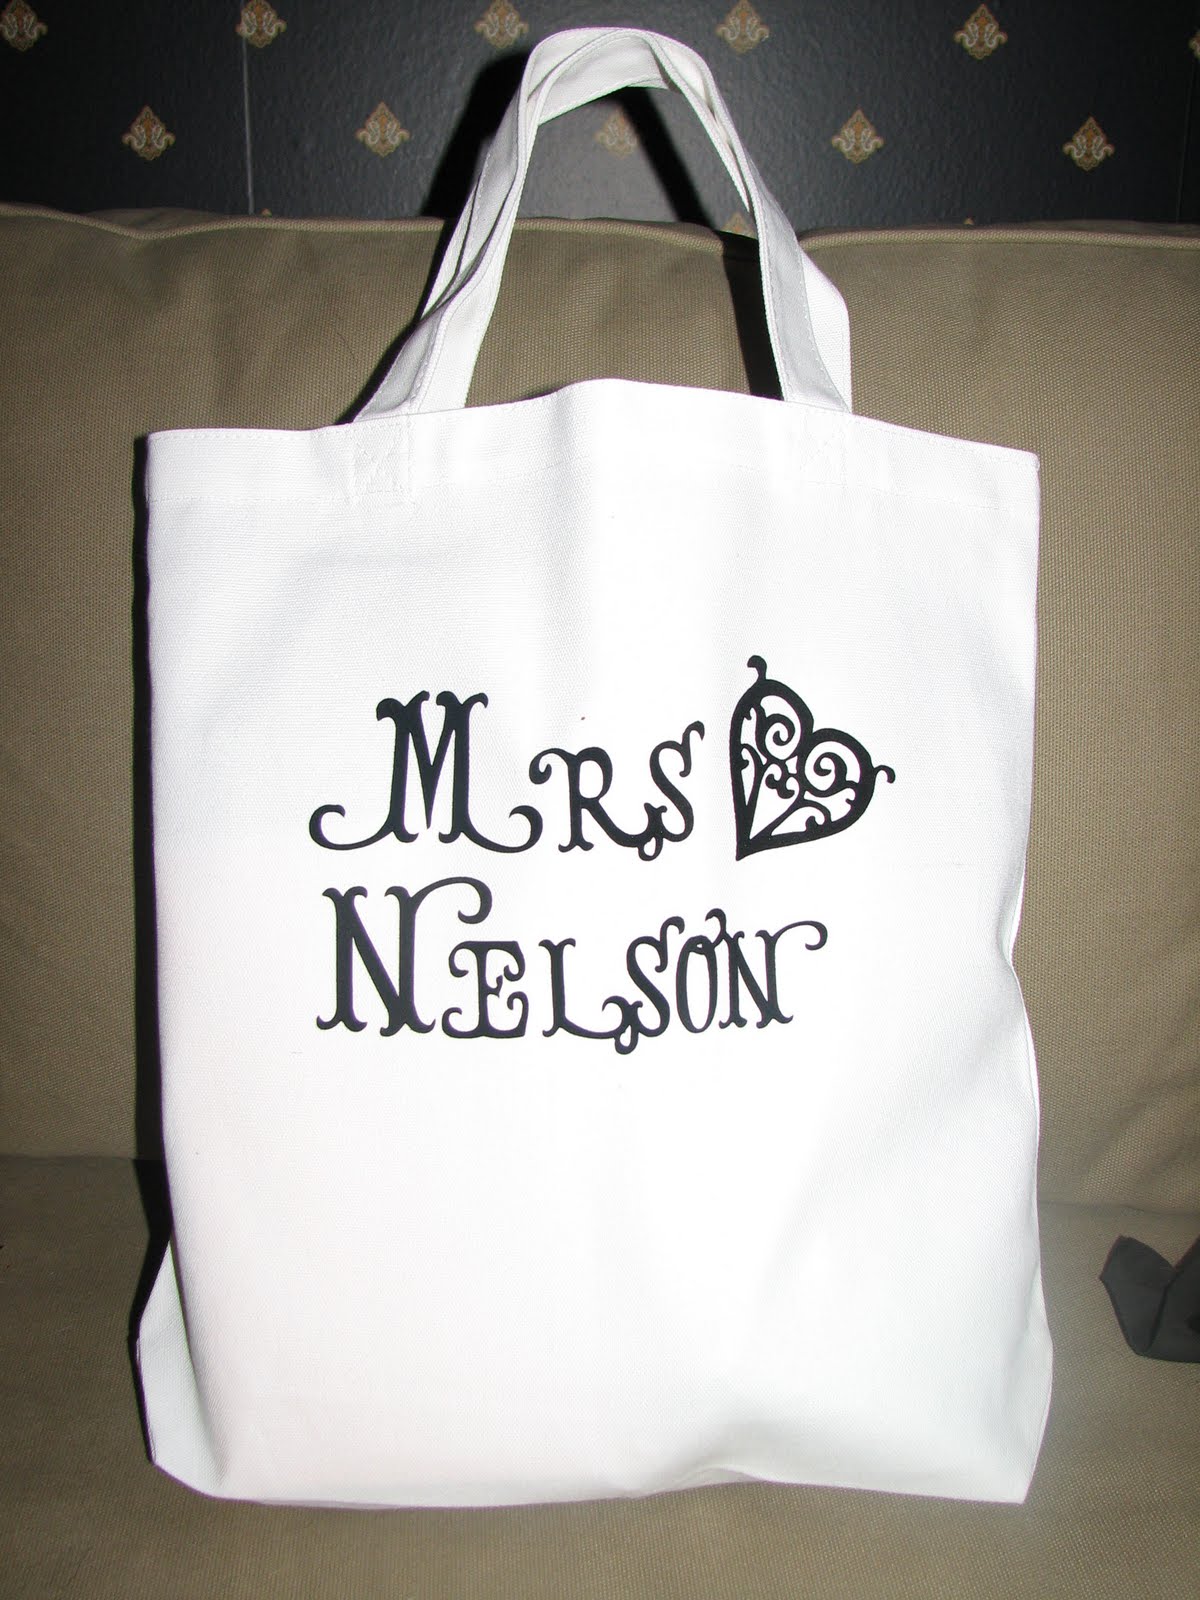
I bought a few of the reusable "green" bags at my local craft store and jazzed them up with iron ons. The bag I have pictured above I made for a friend for her wedding. She was able to carry all of her stuff she needed on her big day in style. I used the Storybook cartridge font for the bag. ** When I make the bags I like using the flocking sheets by June Tailor I get them from JoAnn fabrics. They cut great on my Cricut and iron on very nicely.
The next bag is for another friends dog, Attila, now he can have all of his stuff in his bag ready to go to the dog park or to come for a visit to my house ;) I made it with the Disney Mickey Font Cartridge. The last bag I made to bring along all of my things I need for my foot. I have RSD and need to have a variety of thing with me when I'm away from home, ice packs, folding cane, pain patches, etc. I don't want to let it get the best of me so I always want to remind myself to LIVE LIFE despite any pain I may encounter. I used the Graphically Speaking cartridge for this bag.
I've made these wine bottle aprons and chef hats to give as gifts to the hostess' of barbeques we have attended. They are great to give as gifts. The Mon Cherie one I gave to my sister, her name is Cheri and can speak french fluently and has gone to france many times so I thought it was appropriate for her. The pattern I just made up and then bound the edges with bias binding. The design was embroidered on using my Husqvarna embroidery machine. I'm sure you could also iron on something that you cut from your Cricut in iron on transfer. The hat I just ad-libbed cutting out a circle and sewed it to a strip about the size of the top of my bottle. I've got to get going on more for this summer. I have now included the pattern of the apron for you! I ad-libbed the hat so there is no pattern for that, Sorry. Have a great day!
I made this card using a Hero Arts stamp. I had to stamp it twice to get it to cover the card front. I stamped it with Distress embossing ink and covered with clear embossing powder. After heating it I used the Tim Holtz distress inks to apply color to the front and back of the card. I applied them with the foam applicator. I blended them well. When I was finished I took a slightly moistened papertowel and wiped any extra ink off the floral print. The inside of the card reads: You Brighten My Day!
This tutorial will show how I organize my embossing folders. I have a lot and love to use them for everything...cards, scrapbook pages, home dec, etc. It is a quick and easy way to referance waht you have and how it will look in your project. Much easier than looking at the folder itself. Also, if you have the Tags, Bags, Boxes & More cartridge from Cricut you can use the file I included that has 4 tags on one 12 X 12 page all perfectly sized for you.
I made this phone card with a SVG I made using the Sure Cuts a Lot. I reinforced the paper I used for the card with cardstock by running it through my Xyron and then trimming it to size. I cut the Phone out on my Cricut and inked it with Tim Holtz Distress inks to give it some depth. I then sprayed it with some Glimmer Mist. For the script on the phone I stamped it after I glimmer misted with Archival ink. I used the Faded Text Background stamp by Stampabilities. I love how it looks. I was afraid if I sprayed the glimmer after it might take away from the text. I printed the Miss You out on my computer on tan cardstock, distressed the edges, and mounted it on the same red cardstock used for the phone. I added a few black crystals on the corners and pop dotted to raise the message off of the card. I love the finish look. Enjoy the SVG! I would love to see what you create with it.
I made this card using the Cuttlebug and the Sp0ts & Dots embossing folder. I embossed it on the QuicKutz metal self adhesive sheets that I cut to size. I then alcohol inked it with the Tim Holtz inks and sanded off the top layer to reveal the top surface. Rounded the corners with my Corner Chomper and accesorized it. Lots of bang for a little buck!
I created this card this morning on my Make The Cut! I love the art nouveau style of this card. I made it from my Make the Cut program, I cut the top layer out of white cardstock and the bottom layer out of a red music note paper I reinforced with white cardstock. I then took the top layer and sprayed it with Glimmer Mist to give it that beautiful shimmer. I have included the cut file for you to enjoy.
Get Make the Cut file Here Get the SVG file Here Get the GSD file Here
I made this Mother's Day card from the Cricut Mother's Day Cartridge. I embossed the front red section with the Cuttlebug using the Floral Screen embossing folder and raised it with foam dots.
The inside "Mom" was cut using the Mother's Day Cartridge. I cut the bottom border from the EK border punch-Acanthus Leaf. I created the i "heart" U from a grungeboard i and U that I alcohol inked and a clear heart that was also alcohol inked. I LOVE my Tim Holz Adirondack alcohol inks! I Glimmer Misted the Mom for a little extra sparkle.
I created these decanter labels from things I found in the jewelry department at JoAnn fabrics. I needed a way to distiguish what's in the decanter once it was poured. So I made these removable "necklaces" for the bottles. That way it is easy for cleaning and changing the labels. The names (Port, Sherry, etc.) were just printed from my computer in a cool font and cut to size.
After getting an overwhelming response I decided to make my first tutorial on how to make the pressed tin tiles used on the coffee table featured on an earlier post. Hope this helps all of you who got great ideas on how they can use this idea in their projects.
You can get the Quickutz adhesive backed metal HERE
I had a question about how I labeled my ink pads. I have attached the files for the labels. I print them out and cut them apart. Working on my craft sheet or a scratch sheet of paper I rub the color ink on the label. If the color is dark (i.e. black) I make sure I do not cover the lettering. I then use my ATG gun to run adhesive along the entire strip and place on the ink pad cover. I like it to cover the sides also so if I can quickly see the color when it is out of the rack. Hope this helps.
This coffee table used to be old and stained and with a chipped wood finish.I refinished this old coffee table for my son's house. I first painted it black. I then created the "Pressed Tin Tiles" using the 10 Second Studio Big Mama 02 mold and the QuicKutz 4 X 12 adhesive metal sheets. I cut the metal sheets to 4 X 4 and then ran it through the Cuttlebug. I then applied Adirondack Alchohol Inks in a couple of colors using the felt applicator. When I liked the look I sanded off the top to reveal the design. All the center ones are in shades of brown and the outer cut tiles are in a darker tone. I finished it by covering the table with glass to protect the tiles and make clean up easy. He now loves his one of a kind table.
Disclaimer: Any pictures shown are for your inspiration only and may not be used for constest submission, as I reserve that right for myself. All Content including text, photos, designs and videos are copyright protected.


.JPG)
.JPG)
.JPG)


.JPG)
.JPG)


 I created these decanter labels from things I found in the jewelry department at JoAnn fabrics. I needed a way to distiguish what's in the decanter once it was poured. So I made these removable "necklaces" for the bottles. That way it is easy for cleaning and changing the labels. The names (Port, Sherry, etc.) were just printed from my computer in a cool font and cut to size.


.JPG)


